
OSI Project No2
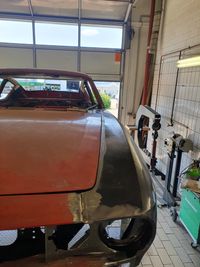
This OSI 2,3TS has been found in an amazing good shape compared to most of the bodies we have seen so far. With the exeption of the LHS A Pillar, all sheet metal areas are untouched. Perfect foundation for the body restoration.
The car came to its owner 45 years ago for 2600,-DM and after an unlucky trial to repair the rusted Pillars and Rockers, it went to it's castle to sleep the next 45 years. Luckily, the owner ordered and received an original LHS Fender at that time, which will be a real pleasure for us to make it fit to the car.
*** Clicking the picture or text will lead you to a photo collection ***
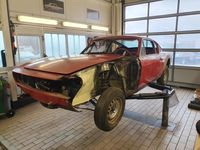
Base Condition
Pictures show the amazing good shape of the body with the expeption of A Pillars and Rockers.
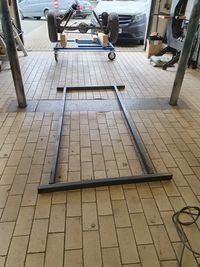
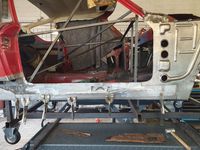
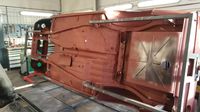
Building of a Body Carrier
After disassembling of the rear and front chassis parts a carrier has been built to fix the Body. Due to the low damage level there is no need to use the Celette system and the body can be moved around a lot easier. All relevant areas are reachable for the coming operations. The pictures show measures and dimensions, so it could be used as kind of a build plan of the carrier.
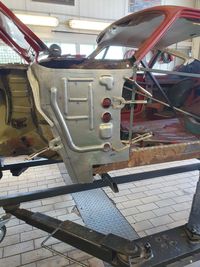
Recreation of A Pillar Area LHS
Even this almost untouched OSI body needs a lot of care in the area of the A Pillar. To rebuild that area, a lot of parts are made new or get a repair. The central item is the A Pillar Inner panel. Final joining starts after numerous fitting trials of all relevant body parts.

Rebuild of Rocker Panels
By disassembling the original Rocker Panels from this OSI body, we get a perfect chance to rebuild this essential and always corroded body part. Two good friends assisted by giving access to bending machines (Fa. Hemmersbach, Waldbröl) and great advise and assistance in using the great Eckolt forming device (Fa. Gerd Breuer, Drolshagen) Many thanks to Gerd Breuer for his help and advising while buildng this important piece of metal!
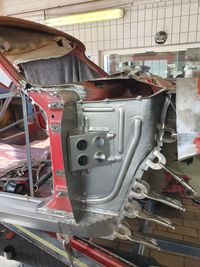
Repair of Bodyside and Rear Quarter LHS
To eliminate any kind of corrosion spots a few new parts are made as there are rear quarter inner and outer, body side front lower part and a section of the wheel house. Thanks to Gerhard Leppen, who supplied parts of the wheel arch outer from his stock. The result looks fine!
Refurbish of Bodyside Quarter RHS
The following parts had to be repaired or rebuild to avoid future corrosion issues: Reinforcement rear bumper joint/rear rail, rear quarter lower inner/outer, wheelhouse lower inner/outer front/rear, wheelarch inner/outer, bodyside lower front. Opening and renewal of lower joints have been mandatory.
Renewal of A Pillar structure RHS
Corrosion damage looks pretty much the same on either left and right hand side of the structure. Before the structure is dismantled, the application of a subframe is mandatory to avoid major deformation. The following parts have been repaired or renewed: cowl top/lower, A PLR inner/outer, A PLR closing panel, A PLR reinforcement, A PLT joint reinforcement. Welding starts after several adjustments and fit and finish checks.
Repair of Floor Panel and Rocker Inner
Floor panel, rocker inner and the front jacking point need a partly repair. on the right hand side as well. In addion there is the 50mm wide elongation of the lower flange to allow the ford rocker inner to match the OSI rocker outer panel. Our inhouse manufactured rocker outer panel helps a lot to get to a proper fit and finish in that area.
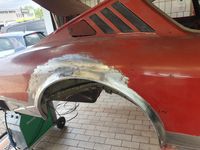
Fitting a NOS OSI Fender!!
Not sure, if there is another NOS OSI fender existing. However, fitting this very rare piece of sheet metal was a lot of fun. All joining flanges had to be replaced due to corrosion and the area, that should match the door, needed a massive rework to allow this Fender to match this OSI. Fit and finish will become perfect with tinning at the end of the body work.
Repair of doors
First look of Doors was not bad, but sandblasting always shows the brutal truth. Lower flanges and door lower inner have corrosion defects and it was a good idea to strip them. Repairs are made of door inner, before a new piece of door outer panel gets welded to the remaining part. After fit and finish door window frame and sealing are reassambled, to give the paint man a chance to create a perfect outer surface.

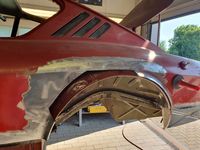
Repair of Fender RHS
As usual the rear part of the Fender is heavily corroded and will be raplaced by a hand made spare part. It needs an enormous effort to match Door shape, Windscreen opening, Hood and remaining Fender shape, before welding the new part to the remaining structure. After sand blasting even the front part of the Fender shows corrosion damage, which is also repaired by hand made panels.
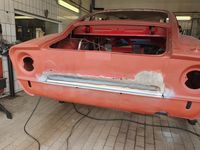
Repair of Back Panel
A defektive sealing on the inner side of the upper back panel causes more damage than expected. Therefore a part of the back panel has to be replaced, as well as the inner flange. To allow a proper fit of an alternative rear muffler, the lower part of the back panel gets a wider cut out.
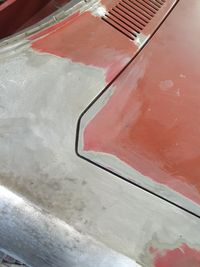
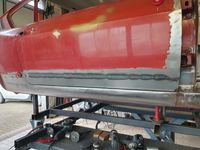
Tinning
After all welding is done transitions and gaps between relevant parts are developed by tinning. As it was done in the original plant, tinning is used to achieve the necessary tolerances, which also help the paint preparation. When the body leaves our venue, doors, hood and deklid are mounted and correctly positioned, inkluding seals and locks, to allow the painter to achieve nice surfaces.
Rework
A turnframe is used to allow a proper rework especially on the underbody. Final welding, grinding and priming are the main tasked at the end of this project. The turn frame will also be used later for sealing the underbody.